

When an automated test fails in CI at three in the morning, the first question is always the same: what did the page actually look like? Screenshots answer that question instantly. They give stakeholders visual evidence they can scan in seconds, and they give QA engineers the forensic detail they need to diagnose a failure without rerunning anything.
Webship-js, the BDD-first browser automation harness built on Playwright and Cucumber-js, treats screenshots as a first-class feature. Version 2.0.x ships with a complete set of screenshot steps that cover viewport captures, full-page captures, on-the-fly viewport resizing, custom filenames with dynamic tokens, automatic failure captures, and flexible per-project configuration. This article walks through all of it.
Two files per capture, not one
The first thing that sets Webship-js apart is that every capture writes two files to disk. The first is a PNG image taken with Playwright's screenshot API. The second is an HTML snapshot containing the full page markup at that exact moment.
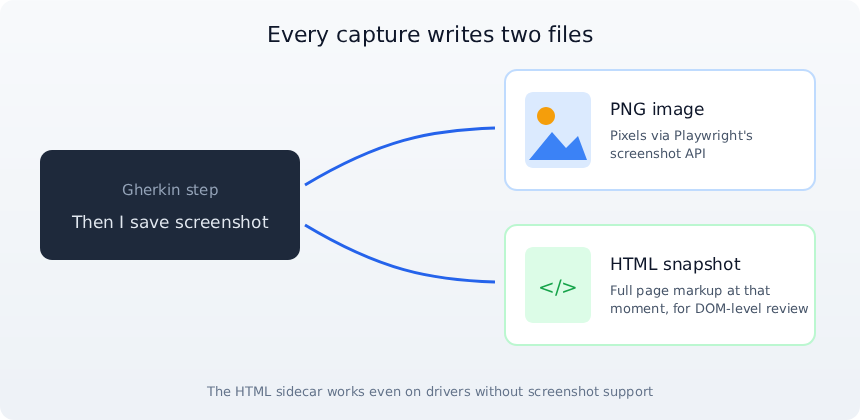
That HTML sidecar turns out to be a quiet superpower. Some rendering problems are far easier to diagnose in the DOM than in pixels. A missing class, an unexpected inline style, or a component that rendered empty will jump out of the markup long before it jumps out of an image. And because the HTML capture does not depend on the browser's screenshot capability, it keeps working even on drivers that cannot take screenshots at all.
You can also enrich the HTML snapshot with context. By setting the infoTypes option, each HTML file can be prefixed with lines recording the current URL, the feature, the step, and the datetime of the capture, so you always know exactly where a snapshot came from.
Screenshots that take themselves
Before we get to the manual steps, it is worth knowing that Webship-js captures some screenshots on its own.
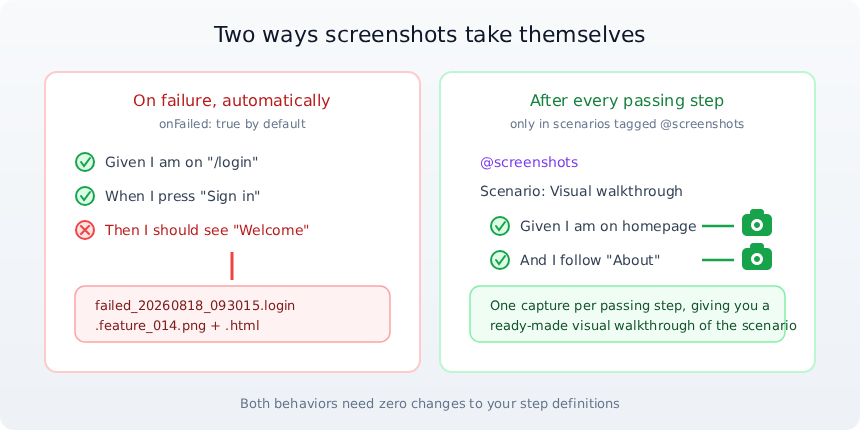
Whenever a step fails, a built-in hook automatically saves a screenshot. This behavior is on by default, and failed captures get their own filename pattern with a failed_ prefix, so a red run is easy to triage. You simply scan the artifacts directory for anything starting with failed_.
There is also a lightweight way to record an entire scenario visually. Tag it with @screenshots and Webship-js will save a capture after every passing step of that scenario, and only that scenario. It is a targeted alternative to enabling the global onEveryStep setting, and it turns any scenario into a step-by-step visual walkthrough without changing a single line of its steps.
The manual steps
All screenshot steps work equally as When or Then, and the pronoun is flexible. You can write I, we, or drop the pronoun entirely and write Then save screenshot.
A basic viewport capture
The simplest form captures whatever is visible in the viewport:
Given I am on "/about-us.html"
 Then I save screenshot
The PNG and its HTML twin land in the configured screenshot directory, which is created on demand. Files are named using a configurable pattern, with {datetime}.{feature_file}.feature_{step_line}.{ext} as the default, so captures sort predictably in CI artifacts. One nice detail: if you have enabled the alwaysFullscreen option in configuration, this step quietly upgrades itself to a full-page capture.
Capturing the whole page
For long articles, landing pages, or anywhere below-the-fold content matters, the fullscreen variant passes fullPage: true to Playwright and captures the entire scrollable height of the document rather than just the visible viewport:
Given I am on "/about-us.html"
 When I wait 2 seconds
 Then I save fullscreen screenshot
Capturing at specific viewport sizes
Responsive layouts need to be seen at more than one size, and Webship-js lets you do that in a single scenario. The sized variants resize the viewport to the given width and height first, then capture:
Given I am on homepage
 Then I save 375 x 667 screenshot
  And I save 768 x 1024 screenshot
  And I save fullscreen 1920 x 1080 screenshot
Common pairs are 375 x 667 for a phone, 768 x 1024 for a tablet, and 1920 x 1080 for a desktop. The fullscreen variant additionally captures the full scrollable page at that width.
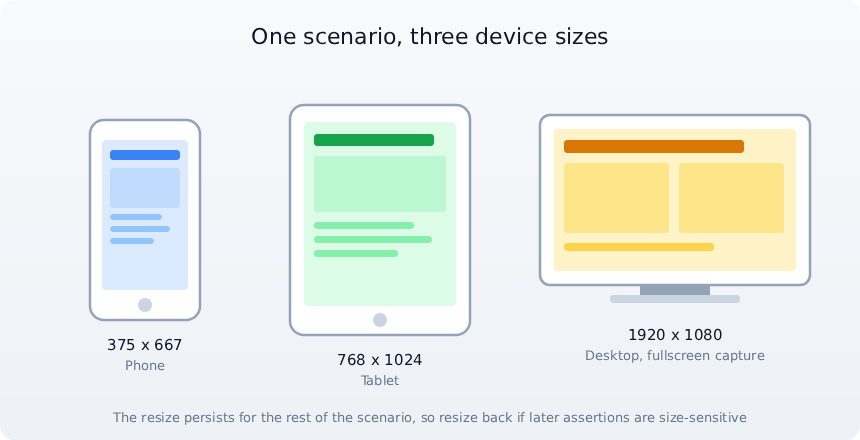
One important caveat: the resize persists for the rest of the scenario. Later steps run at the new size, so if subsequent assertions are size-sensitive, resize back explicitly or use the dedicated responsive steps.
Naming your captures
When you want deterministic filenames, perhaps for a visual-diff pipeline or a documentation build, use the named variants:
Given I am on "/news"
 Then I save screenshot with name "news-latest.png"
  And I save fullscreen screenshot with name "news-{datetime}.png"
Names can embed any of the filename tokens described later in this article, for example "un-landing-{datetime}.png", "{feature_file}_{step_line}", or "{url_path}.png". If the name does not end with an extension or the {ext} token, the extension is appended automatically, so you still get both the PNG and the HTML variant.
Quick recap
That gives you six step variants in total, and they compose naturally. The plain Then I save screenshot captures the viewport, while Then I save fullscreen screenshot captures the whole page. Adding a size, as in Then I save 1440 x 900 screenshot or Then I save fullscreen 1440 x 900 screenshot, resizes the viewport first. And appending with name "homepage.png" to either the plain or fullscreen form gives you full control over the filename, tokens included.
A complete feature file
Here is everything working together in one feature:
Feature: Save screenshots to disk.
  As a tester,
  I want to capture screenshots at arbitrary points in my scenarios
  so that I can review rendered pages and debug failures.

  Background:
    Given I am on homepage

  Scenario: Save a screenshot at the current viewport size.
    Then I save screenshot

  Scenario: Save a full-page screenshot at a fixed viewport.
    Then I save fullscreen 1200 x 800 screenshot

  Scenario: Save a screenshot with filename tokens.
    Then I save screenshot with name "{feature_file}_{step_line}_{datetime}.png"

  @screenshots
  Scenario: Auto-capture a screenshot after every step in a tagged scenario.
    Given I am on "/about-us.html"
     Then I should see "About Us"
Configuring the behavior
Screenshot settings resolve per scenario through three layers, from highest priority to lowest. Environment variables prefixed with WEBSHIP_SCREENSHOT_ win, which makes them ideal for CI and shell overrides. Next come the worldParameters.screenshot settings in your project's cucumber.js, which act as per-project defaults. Finally, the built-in defaults cover anything you have not set.
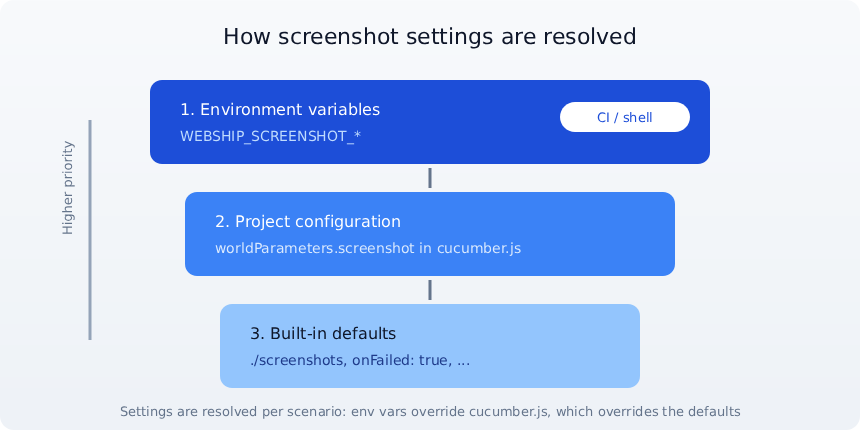
Every setting is available under both names: an environment variable prefixed with WEBSHIP_SCREENSHOT_ and a matching key under worldParameters.screenshot. Here is what you can control.
The output location is set by WEBSHIP_SCREENSHOT_DIR (the dir key), defaulting to ./screenshots, and the directory is created if it does not exist. If you want each run to start clean, WEBSHIP_SCREENSHOT_PURGE (purge) empties the directory once at the start of the run; it is off by default.
Two settings govern the automatic captures. WEBSHIP_SCREENSHOT_ON_FAILED (onFailed) controls the failure hook and is on by default, while WEBSHIP_SCREENSHOT_ON_EVERY_STEP (onEveryStep) captures after every passing step in every scenario and is off by default. A third, WEBSHIP_SCREENSHOT_FULLSCREEN (alwaysFullscreen), upgrades every capture to a full-page one when enabled.
Filenames are shaped by three more options. WEBSHIP_SCREENSHOT_PATTERN (filenamePattern) sets the pattern for normal captures, defaulting to {datetime}.{feature_file}.feature_{step_line}.{ext}. Failed captures use their own pattern via WEBSHIP_SCREENSHOT_PATTERN_FAIL (filenamePatternFailed), which is the same pattern with {failed_prefix} in front, and the prefix itself is configurable through WEBSHIP_SCREENSHOT_FAILED_PREFIX (failedPrefix), defaulting to failed_.
Finally, WEBSHIP_SCREENSHOT_INFO_TYPES (infoTypes) takes a comma-separated list drawn from url, feature, step, and datetime, and prepends the corresponding context lines to every HTML capture. It is empty by default.
The filename token system
Tokens are what make the screenshot steps genuinely useful in CI. Instead of a folder full of anonymous images, you get filenames that describe exactly what each capture is.
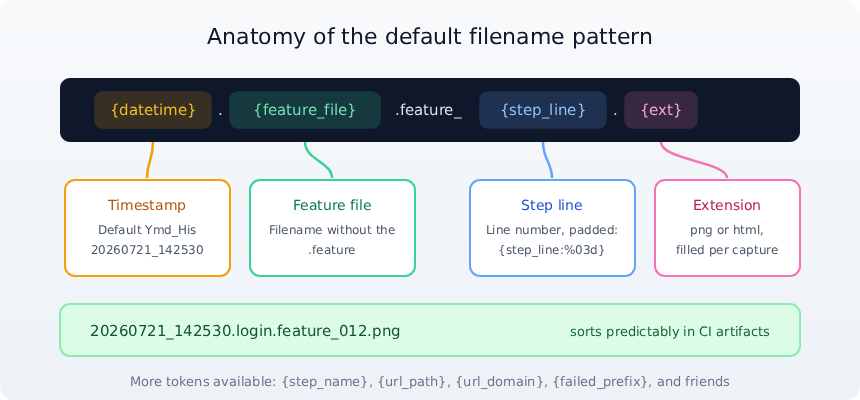
The workhorse is {datetime}, which expands to the capture timestamp in Ymd_His format by default, producing values like 20260721_142530. You can supply a custom format too, such as {datetime:YYYY-MM-DD_HH-mm-ss}.
Two tokens tie the capture back to its origin in your test suite. {feature_file} expands to the feature's filename without the .feature extension, and {step_line} expands to the line number of the current step, with optional zero-padding like {step_line:%03d}. If you prefer human-readable names, {step_name} inserts the text of the current step itself, sanitized for the filesystem with spaces converted to underscores and quotes stripped.
A whole family of URL tokens ties the capture to the page instead. {url} gives you the full current URL, and its siblings extract a single component: {url_origin}, {url_domain}, {url_path}, {url_query}, {url_fragment}, and {url_relative}. All of them are sanitized so the result is always a valid filename.
Rounding out the set, {failed_prefix} expands to the configured failure prefix (failed_ unless you changed it), and {ext} expands to the file extension, filled in as png or html for each of the two files a capture produces.
Practical tips
A few habits will keep your screenshot workflow clean:
Use the @screenshots tag when you only need step-by-step captures for one scenario, rather than enabling onEveryStep for the entire suite.
If your test reporter already attaches screenshots on failure, disable the built-in failure capture with WEBSHIP_SCREENSHOT_ON_FAILED=false to avoid duplicates.
In CI, set WEBSHIP_SCREENSHOT_PURGE=true so each run starts with an empty artifacts directory. The purge happens only once per run, so parallel scenarios will not delete each other's captures.
Remember that the viewport-resizing steps do not restore the previous size. Resize back, or use the responsive steps, if later assertions are size-sensitive.
Wrapping up
Screenshot support in Webship-js 2.0.x is more than a debugging convenience. It is a complete visual-evidence pipeline: manual captures where you want them, automatic captures where you need them, dual PNG and HTML output for both human and DOM-level review, and a token-based naming system that keeps thousands of CI artifacts organized and searchable.
The screenshot group is one of 411 built-in steps across 36 step files in Webship-js, and it pairs naturally with the responsive steps, video recording, and the Diffy visual-diff workflow. If you are already writing Gherkin, adding rich visual evidence to your suite takes exactly one line:
Then I save screenshotTo dig deeper, see the Webship-js 2.0.x documentation and the Screenshot Steps reference.