
In the world of website and system management, tables are always at the core: user names, records, operations, all stored there. And sometimes, simply checking that options like Edit or Delete appear in the right row makes a huge difference. It ensures the system works as expected and gives you the flexibility to modify or remove data with ease.
The problem? Testing these details manually can be boring and time-consuming. That’s where Webship-js comes in: a tool built to make the process simpler and faster. With just two steps, Click and See, you can confirm the options appear exactly where they should, with no headaches and no unnecessary complexity.
The basic steps used are:
When I click "operation" in "text" row
This step finds a table, locates a row containing the identifier text, and then clicks on the target text within that row.
Clicks on specific text within a table row that contains a specified identifier text.
Example:
When I click "Edit" in the "John Smith" row
When I click "Delete" in the "Product A" row
When we click "View Details" in the "Order #12345" row
And I click "Download" in the "Report 2024" row
Then I should see "operation" in "text" row
This step finds a table, locates a row containing the identifier text, and then verifies that the target text is visible within that row.
Asserts that specific text is visible within a table row that contains a specified identifier text.
Example:
Then I should see "Active" in the "John Smith" row
Then I should see "In Stock" in the "Product A" row
Then we should see "Processing" in the "Order #12345" row
And I should see "Admin" in the "john.smith@example.com" row
Asserts that specific text is NOT visible within a table row that contains a specified identifier text.
Example:
Then I should not see "Admin" in the "Jane Doe" row
Then I should not see "Out of Stock" in the "Product A" row
And I should not see "Inactive" in the "john.smith@example.com" row
Real Testing Context
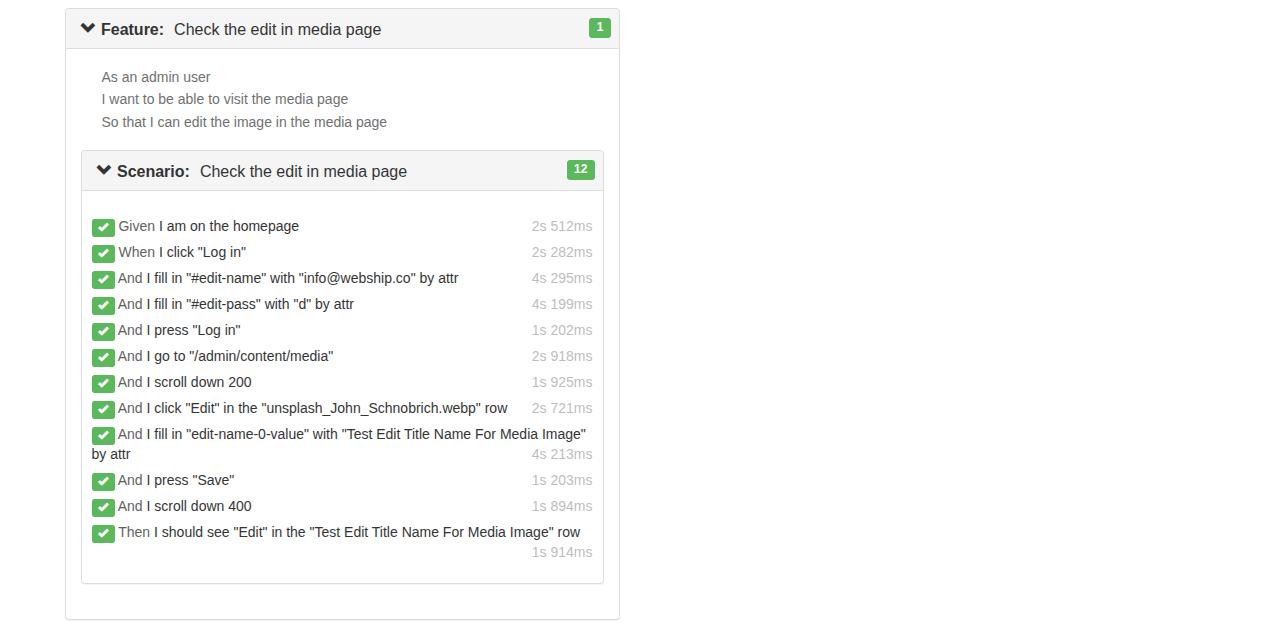
We’ll perform a simple test using Webship-js on a Drupal CMS system. We’ll start by logging in as an admin, then navigate to the media page table. From there, we’ll locate a specific image within a table row, click on Edit, update its title, and press Save. Finally, we’ll confirm the change by checking that the Edit option appears next to the updated image title in the same table row.
Feature: Check the edit in media page
 As an admin user
 I want to be able to visit the media page
 So that I can edit the image in the media page

 Scenario: Check the edit in media page
   Given I am on the homepage
    When I click "Log in"
     And I fill in "#edit-name" with "info@webship.co" by attr
     And I fill in "#edit-pass" with "d" by attr
     And I press "Log in"
     And I go to "/admin/content/media"
     And I scroll down 200
     And I click "Edit" in the "unsplash_John_Schnobrich.webp" row
     And I fill in "edit-name-0-value" with "Test Edit Title Name For Media Image" by attr
     And I press "Save"
     And I scroll down 400
    Then I should see "Edit" in the "Test Edit Title Name For Media Image" row
In this video, we’ll show how to quickly edit any content inside a Drupal CMS table row in simple steps.
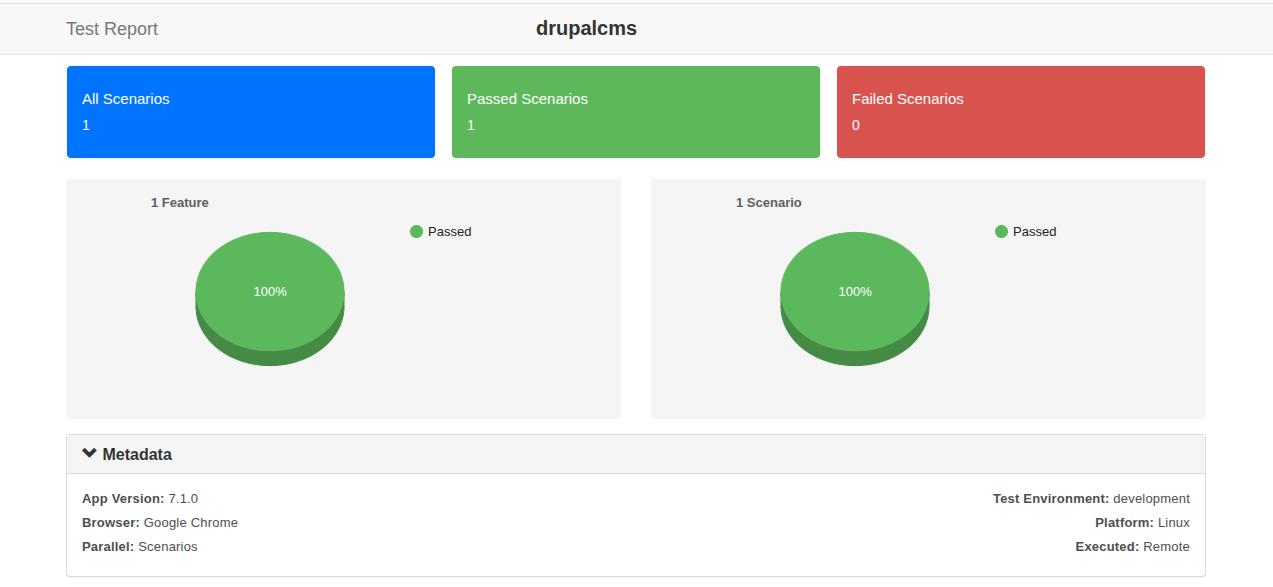
Display the results in the form of a report
You can see that all steps have been completed successfully
Manual testing is like washing dishes by hand: tedious, slow, and never-ending.
Automated testing, on the other hand, is like using a dishwasher: fast, automatic, and a real time-saver.
So the next time you think about browsing through rows one by one... just remember: machines love repetitive work, humans don’t!

Learn more about Step Definitions in Webship-js
Visit the documentation site:- https://webship.co/docs


