
@webship.co/workspace-keycloak 1.0.0 · github.com/webship/workspace-keycloak · npm
Keycloak for the Webship Workspace dashboard: a builder that makes a real Keycloak sign-in server in containers (the official image in development mode, a realm imported from a file, and a small test app next to it that signs in through it), a tool for the server's own admin CLI, the default accounts (one with a one-time code), the Keycloak step pack wired into the workspace's testing setup, and its AI items — two agents, a skill, a command and two prompts — each listed in the workspace folder of its kind.
The workspace is container-based (DDEV by default): a sign-in server is a row like any other, so the row menus the core draws (start, stop, launch, clone, remove, tests) work on it unchanged, but for its accounts: its row has no Users menu, and the test users items of its Tests menu are not for it. See The default accounts.
It is made from the reference platform plugin, @webship.co/workspace-wordpress, and runs its server the way the Discourse plugin runs its forum: a generic project, and the platform's own image as a service of it.
Use it
cd ~/workspace
bash core/scripts/plugins.sh --require @webship.co/workspace-keycloak --with-needs   # npm install into the dashboard
bash core/scripts/plugins.sh --activate keycloak --with-needs                         # plugins.keycloak in settings.yml
bash core/scripts/plugins.sh --install keycloak                                       # commands, functions, args, AI items
bash core/scripts/plugins.sh --configure keycloak                                     # nothing to configure: it has no settings file
The same four steps are buttons on the dashboard's Settings → Plugins page. --install is idempotent. --uninstall removes what it placed; an AI item you edited stays. --remove keycloak then takes the package out of the dashboard.
Everything the plugin carries lands in the folder it belongs to, when that folder is an active workspace folder:
| What | Lands in |
|---|---|
cmd-keycloak-project.sh, cmd-tools-keycloak-admin.sh |
every active sites folder: dev/, test/, sandboxes/, demos/ |
The agents keycloak-site-builder, keycloak-tester |
ai-agents/ |
The skill keycloak-scenarios |
ai-skills/ |
The command /keycloak-test |
ai-commands/ |
The prompts keycloak-build-and-test, keycloak-scenarios-for-an-area |
ai-prompts/ |
There they are listed like any other item of the folder, and installed into Claude Code from there.
What it needs
A workspace starts empty, so the manifest says what else this plugin needs (needs):
- one sites folder, for the builder and the tool:
dev,test,sandboxes,demos(devis the one added when none is there). The folder also carriescmd-tools-testing.shand the Users tools this plugin's hooks answer to. ai-agents,ai-skills,ai-commandsandai-prompts: the AI folders its agents, its skill, its command and its prompts are placed in.
--require says so, --activate and --install stop until the workspace has them, and --with-needs adds what is missing first:
bash core/scripts/plugins.sh --activate keycloak --with-needs   # dev and the four AI folders are required, activated and installed first
bash core/scripts/plugins.sh --install keycloak
Everything the builder runs for a server runs in containers, through the container tool the workspace already needs, and Python 3, which writes the accounts' JSON on the machine: the server, its admin CLI and the test app's packages are the containers'. The plugin asks for no command of its own on the machine.
What the package holds
| Path | What it is |
|---|---|
commands/cmd-keycloak-project.sh |
The builder, in the Build list as Keycloak (a sign-in server in a container, with a test app), installed into every sites folder |
commands/cmd-tools-keycloak-admin.sh |
The server's admin CLI for one site: what the server is, a kcadm.sh command, a restart, the default accounts |
scripts/functions/fun-keycloak.sh |
The bash functions behind both, sourced by bootstrap once installed; the names the core's tools look for (set_keycloak_users, add_keycloak_users, cancel_keycloak_users, testing_configure_keycloak) |
scripts/args/arg-keycloak.sh, arg-keycloak-admin.sh |
Their argparse; the Build form draws the builder's flags from the first |
scripts/keycloak-site.sh |
Run by bash in the server's container with the server's own admin CLI: the workspace account as the admin of the master realm, the default accounts, their listing (the same script the step pack's test site is built with) |
scripts/keycloak-realm.json |
The test realm webship (the step pack's): its two clients (the test app, and the same app asking for consent), its role, its one-time code policy, its mail to the project's mail catcher |
scripts/app/ |
The test app: a page with the official JavaScript adapter (keycloak-js, Apache-2.0, from npm) |
testing/site.feature |
The first feature a site gets when testing is set up |
ai/agents/keycloak-site-builder.md |
The agent that builds and maintains sign-in servers with these commands |
ai/agents/keycloak-tester.md |
The agent that writes and runs scenarios with the Keycloak step pack |
ai/skills/keycloak-scenarios/ |
The skill: the step pack's phrases by area, the traps found on a real server, three example features |
ai/commands/keycloak-test.md |
The slash command /keycloak-test <site>: set up, match every step, run, report |
ai/prompts/keycloak-build-and-test.md, keycloak-scenarios-for-an-area.md |
Two prompts: whole launch commands for a new session |
src/index.ts |
register(api): what the assistant is told about Keycloak here |
features/keycloak.feature |
Scenarios for the dashboard's own browser suite |
The workspacePlugin block in package.json is the manifest the installer reads.
What is different from a PHP platform
Keycloak is a Java server with its own database, and DDEV has no project type for it. Its official way to run is its container image. The plugin keeps the shape of the reference and changes only this:
| WordPress (the reference) | Keycloak | |
|---|---|---|
| Project | --project-type=wordpress, nginx and PHP |
--project-type=generic --webserver-type=nginx-fpm --docroot=app --omit-containers=db: the web server serves the test app from app/ and sends /auth/ to the server (.ddev/nginx/keycloak.conf), so the router of the container tool needs no port of its own; no database of the container tool's own |
| Recognised by | The DDEV project type | The file .ddev/config.keycloak.yaml (with the server's release and the realm) |
| Getting the code | wp core download |
The official image quay.io/keycloak/keycloak at --keycloak-version (26.8.2 by default), as a service of the project (.ddev/docker-compose.keycloak.yaml), in development mode under /auth |
| Install | wp core install |
--install: the realm file imported at the server's first start (keycloak/import/), and the workspace account made the permanent admin of the master realm (the server's temporary admin of its first start is deleted, and its password leaves the project's files) |
| Database | The container tool's | The server's own file database, in a volume of the project (ddev-<name>-keycloak-data) |
| The container tool's mail catcher | The same: the realm sends to the web container's Mailpit (web:1025), read at https://<name>.ddev.site:8026 |
|
| Accounts | WP-CLI | scripts/keycloak-site.sh, with the server's own admin CLI (kcadm.sh) in its container: a partial import of the accounts with their passwords, roles and one-time code |
| Removing it | ddev delete |
The same: the data volume carries the project's name and goes with it |
| Users menu of the row | Reads the project type | None (the type is generic; the Tests menu's test users items hand it the Webship list): the admin tool's --add-users, or cmd-tools-add-users.sh <name> keycloak |
No public domain, no hosted service and no account anywhere: the app and the server answer at https://<name>.ddev.site through the container tool's router.
The commands
Run them from a sites folder. --help is safe on both.
Build a site
cd ~/workspace/dev
bash cmd-keycloak-project.sh mysso --install --add-users| Flag | What it does |
|---|---|
--install |
Import the realm (the plugin's test realm webship) and make the workspace account the admin of the master realm |
--add-users |
With --install: add the default accounts |
--realm <file> |
With --install: import a realm file of your own (JSON, as the server exports it; ${APP_URL} in it becomes the app's address) instead of the test realm |
--keycloak-version <v> |
The server's release (a tag of quay.io/keycloak/keycloak): 26.8.2 by default |
--login-theme <theme> |
With --install: the realm's login theme, keycloak.v2 (the server's default) or keycloak |
--launch |
Open the test app when it is ready |
The test app answers at https://mysso.ddev.site, the server at https://mysso.ddev.site/auth (the realm's admin console at /auth/admin/webship/console/, its account console at /auth/realms/webship/account/), and the mail catcher at https://mysso.ddev.site:8026. A project of the same name is deleted first, with its data volume.
A build takes about a minute (the server's image is about 470 MB the first time); the server then uses about 850 MB of memory (its heap is limited to 768 MB). Check the free memory first (free -g), and build one site at a time on a machine others use.
The test app signs in with the realm's client webship-app (and webship-partner at /partner/, which asks for consent). A realm file of your own works with the app when it has those clients; the builder imports it either way.
Work on a site
bash cmd-tools-keycloak-admin.sh mysso                                       # version, addresses, accounts, the realm
bash cmd-tools-keycloak-admin.sh mysso --kcadm "get users -r webship --fields username,email"
bash cmd-tools-keycloak-admin.sh mysso --kcadm "get realms/webship --fields loginTheme"
bash cmd-tools-keycloak-admin.sh mysso --restart                             # start the server again and wait for it
bash cmd-tools-keycloak-admin.sh mysso --add-users                           # the default accounts
bash cmd-tools-keycloak-admin.sh mysso --cancel-users                        # delete them
The admin CLI runs in the server's container as the admin of the master realm (the workspace account); its password reaches the CLI on its standard input, never on a command line. The server's data is its own (a file database in the project's volume), not the container tool's: the workspace's database backup does not hold it. A realm export (--kcadm "get realms/webship") keeps the realm's settings.
The default accounts
| Account | Address | Role | Handle in the tests |
|---|---|---|---|
administrator |
administrator@example.com |
the realm's admin (realm-management: realm-admin) |
administrator |
editor |
editor@example.com |
the realm role editor |
editor |
user |
user@example.com |
no role of its own | user |
otpuser |
otpuser@example.com |
a one-time code set up ("Test phone") | otpuser |
The server logs in with the username or the email. Each account has the password of the workspace's other default lists. otpuser's one-time code comes from a fixed key, the same as the step pack's test site: the users registry the testing setup writes carries it (otpSecret), so a scenario works the code out as an authenticator app does. They are for local sites and for tests; the admin of the master realm from --install is the workspace account and is never written into a test.
Manage them with the admin tool, not the dashboard's menus. The dashboard picks a project's account list by its type, and a sign-in server's type is generic: its row has no Users menu, and the "Add the test users" and "Cancel the test users" items of its Tests menu hand it the list of the Webship distribution, which starts by adding Drush to the project with Composer. Leave those two items alone on a sign-in server until the base asks the plugins which list a project takes (webship/workspace#490). Use:
bash cmd-tools-keycloak-admin.sh mysso --add-users      # add them, or give them back their email, names, password, roles and code
bash cmd-tools-keycloak-admin.sh mysso --cancel-users   # delete them
bash cmd-tools-add-users.sh mysso keycloak              # the core's tool: the same list
bash cmd-tools-cancel-users.sh mysso keycloak
Test a site
bash cmd-tools-testing.sh mysso                 # webship-js, the step pack, the users registry, a first feature
bash cmd-tools-testing.sh mysso --run           # run the suite in the container
bash cmd-tools-testing.sh mysso --run --path tests/features/site.feature
cmd-tools-testing.sh is the workspace's own. For a sign-in server it also adds @webship-js/keycloak-steps to package.json, lists its step definitions in cucumber.js after webship-js's own, writes the sign-in server (/auth of the site and its realm), how the test app starts a sign-in (its "Sign in" button), the mail catcher (:8026), the users registry (the handles above, by their usernames, otpuser with the key of its code, overridable with KEYCLOAK_<HANDLE>_USERNAME and KEYCLOAK_<HANDLE>_PASSWORD), dataAdmin (the handle the step pack's test-data steps and clean-up work as), the browser messages that are no error of the site, the tags that keep the pack's assertions that must fail out of a normal run, and the app's address in place of the starter's http://localhost:8080. It places tests/features/site.feature when the project has none, and makes sure the default accounts are in the realm once the server answers again (installing the webship-js add-on restarts the project, and the server with it). Run it again and it adds what is missing and keeps what you changed.
Until @webship-js/keycloak-steps is on npm, give the testing setup its tarball (npm pack of the pack) with bash cmd-tools-testing.sh mysso --add-steps <path to the tarball>, then run the setup again.
The suite runs in the project's container, where the network changes of the host (another container starting) do not cut the browser's requests.
A scenario of your own reads like this one, from the step pack's phrases (the skill keycloak-scenarios lists them by area); what it changes on the account is put back after it:
Feature: The user chooses a new password
  Scenario: A reset link by mail
    Given I am not logged in
    When I ask for a password reset link for "user"
    And I open the "Link to reset credentials" link of the email to "user"
    Then I should be asked to update my password
    When I choose a new password
    Then I should be back in the app
    And I should be logged in as "user"
tests/features/site.feature passes on a site built with --install --add-users, and so do the features of the step pack.
The AI items
ai/ in the package holds one folder per kind, the manifest's ai block names each item, and --install places it in the workspace folder of that kind.
| Kind | Item | Use it to |
|---|---|---|
| Agent | keycloak-site-builder |
Build, maintain or remove a sign-in server with the commands above, in containers only |
| Agent | keycloak-tester |
Set the testing stack up, look at the pages in the Playwright MCP browser first, write scenarios from the pack's steps and run them; it never creates an account in a suite and never writes a platform name into a step phrase |
| Skill | keycloak-scenarios |
Write a scenario from phrases that exist: the pack's steps by area, the handles of the users registry, the test-data steps, the traps found on a real server, and three features that pass on a site with the default accounts |
| Command | /keycloak-test <site> [feature or @tag] |
Run the suite of a site from inside a session: set up when missing, match every step, run, report what failed and why |
| Prompt | keycloak-build-and-test |
Start a session that builds a site, says what it is, sets the testing stack up and runs the first feature |
| Prompt | keycloak-scenarios-for-an-area |
Start a session that writes and runs the scenarios of one area of the server |
After --install each is in its folder on the dashboard. Install there puts an agent, a skill or a command into Claude Code (~/.claude/agents, ~/.claude/skills, ~/.claude/commands), or from the command line:
cd ~/workspace/ai-agents   && bash cmd-tools-ai-items.sh keycloak-tester --install
cd ~/workspace/ai-skills   && bash cmd-tools-ai-items.sh keycloak-scenarios --install
cd ~/workspace/ai-commands && bash cmd-tools-ai-items.sh keycloak-test --install
A prompt is not installed: it is the whole claude … launch command of a new session, and the dashboard's New screen form lists it as a template. By hand, fill the placeholders in and run the command of the file from the folder it names.
The items are written for any AI CLI, with Claude Code as the default shape: the frontmatter and the file layout are Claude Code's, the body of each item is plain Markdown that names no tool or feature of one CLI, a command says in words what its arguments are, and the text between the triple quotes of a prompt can be given to another AI CLI as it is.
Every step phrase the items show is checked against the definitions of the step pack and of webship-js (tests/fixtures/step-definitions.txt), and every command and flag against the plugin's own.
Develop it
npm install     # builds dist/ (TypeScript)
npm run lint
npm test        # the manifest, the commands, the AI items, the functions against a scaffolded project
CI runs the same on Node.js 20 and 24, parses every shell script, and runs the plugin's features/keycloak.feature against a dashboard with this plugin installed (webship/workspace/.github/workflows/plugin-browser-suite.yml).
In pictures
Build a Keycloak sign-in test site
Add the plugin: require, activate and install @webship.co/workspace-keycloak (see "Add a Webship Workspace plugin"). Its tab in Settings says it is turned on and what it needs.
bash core/scripts/plugins.sh --require keycloak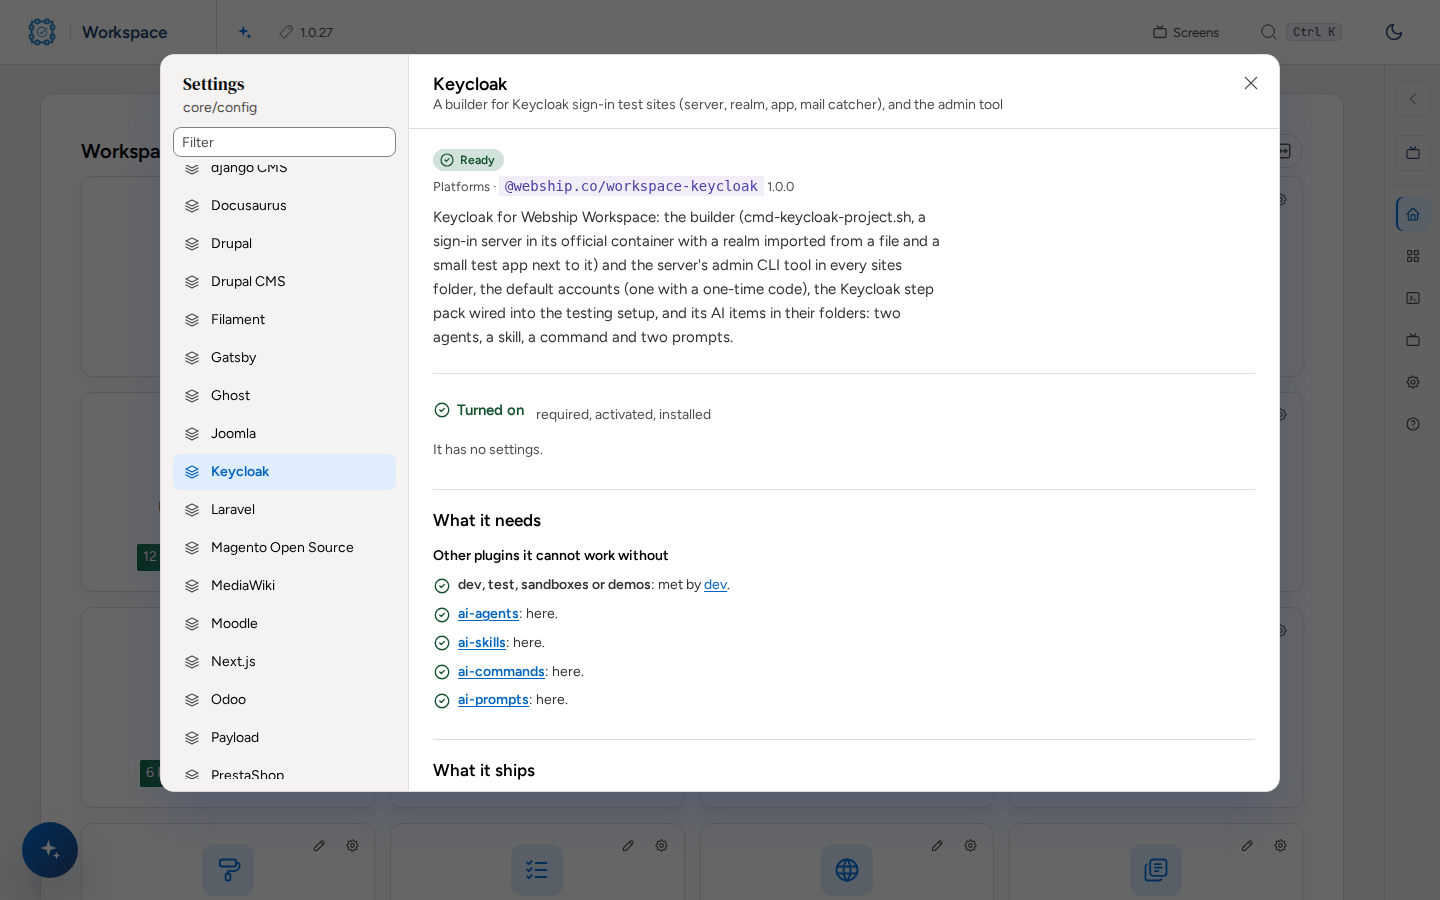
Open a sites folder such as Dev, pick "Keycloak (a sign-in server in a container, with a test app)", type a name and open Arguments for its options.
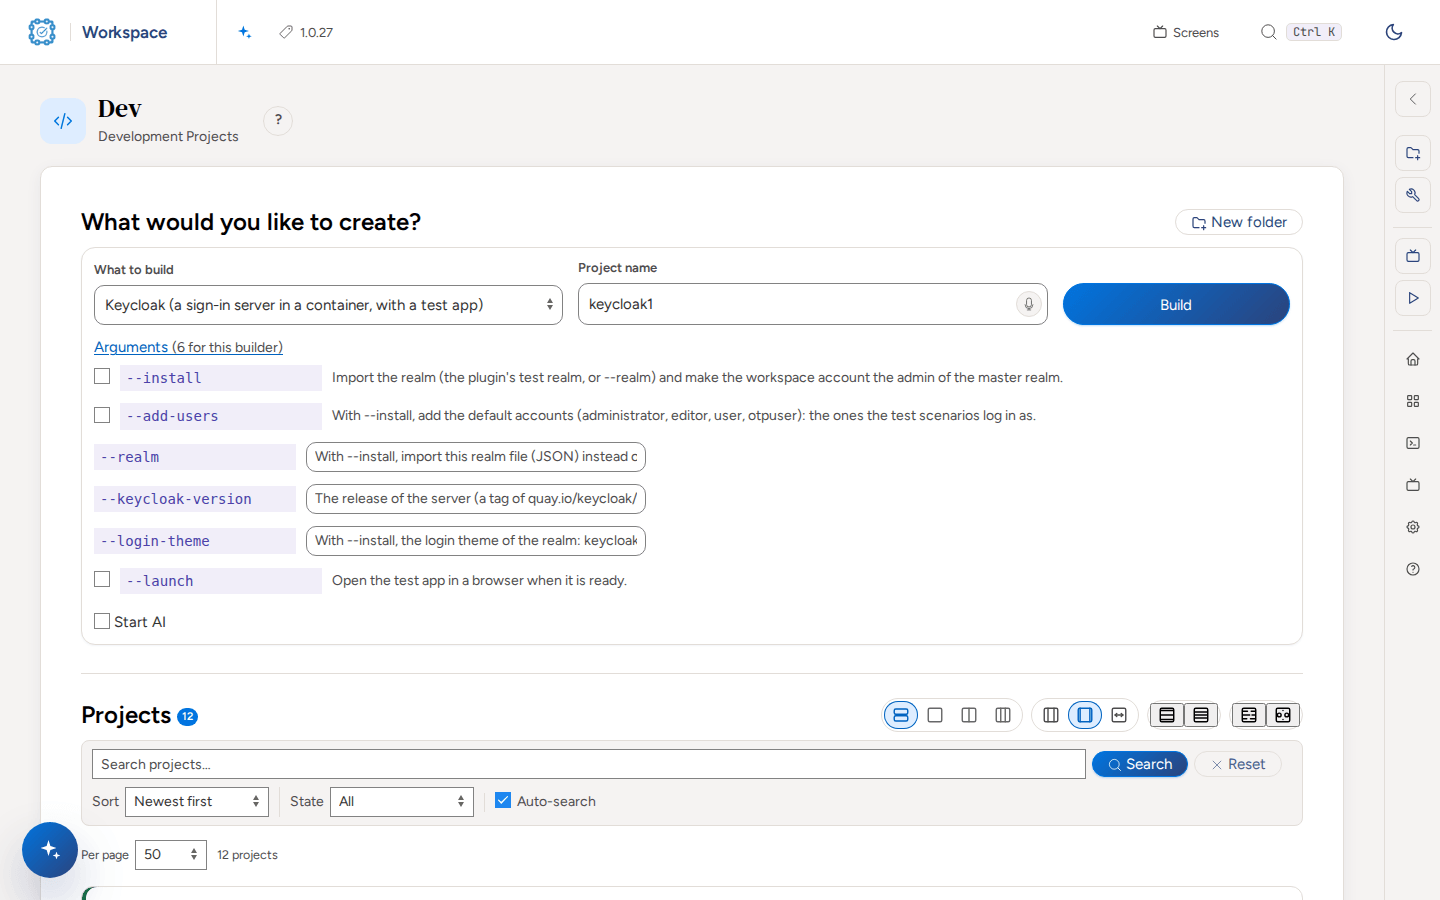
Press Build. The builder makes the sign-in test site in a container (DDEV by default) and runs in a screen session you can watch on Screens.
bash dev/cmd-keycloak-project.sh keycloak-demo --install --add-usersRun a tool lists cmd-tools-keycloak-admin.sh. Type the project and what to run, and press Run.
bash cmd-tools-keycloak-admin.sh keycloak-demo --kcadm "get users -r webship --fields username"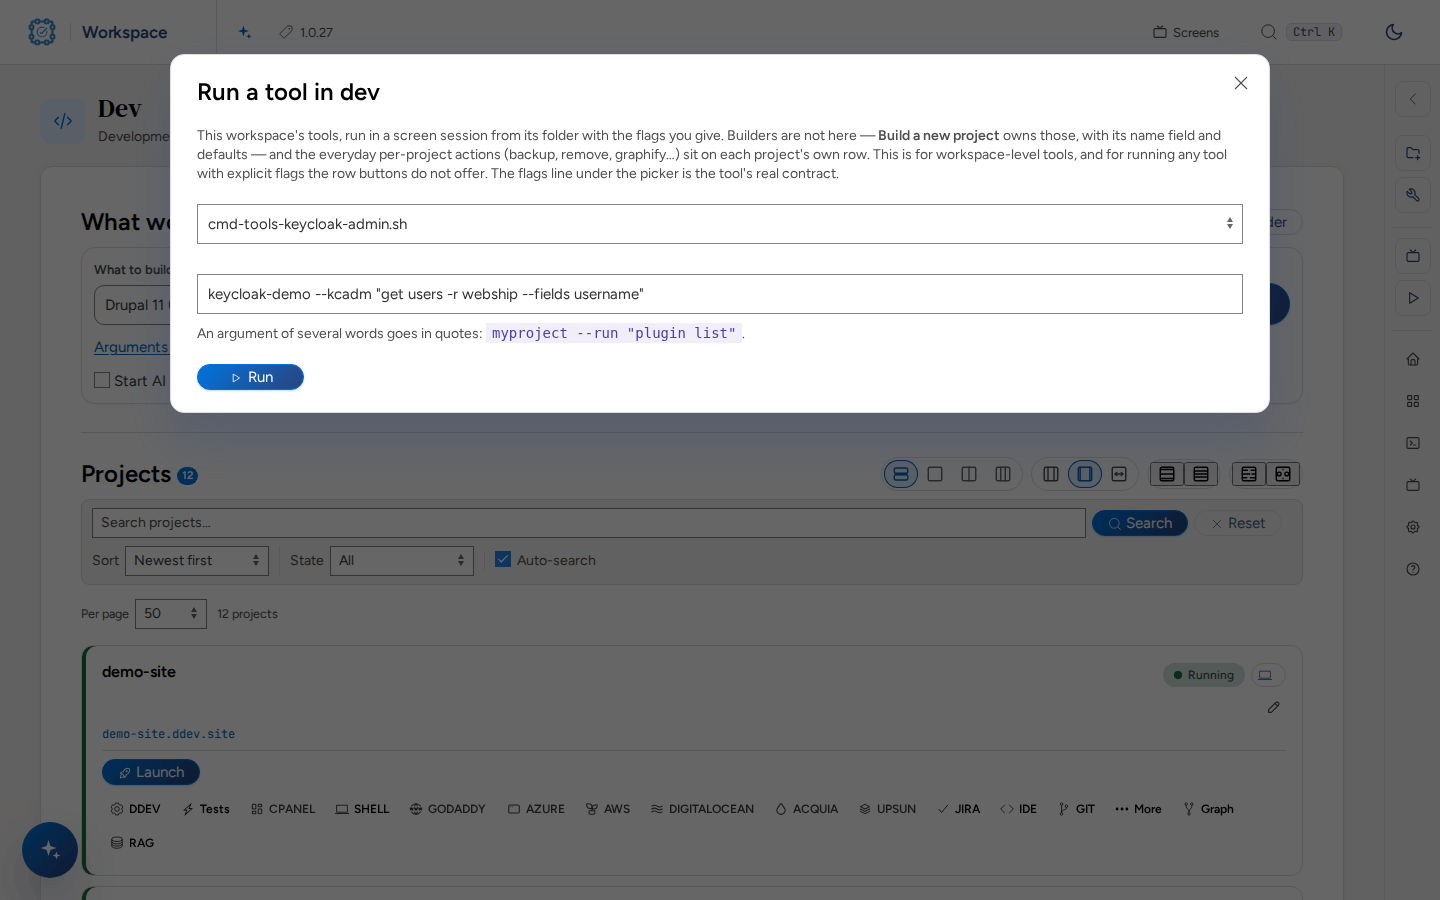
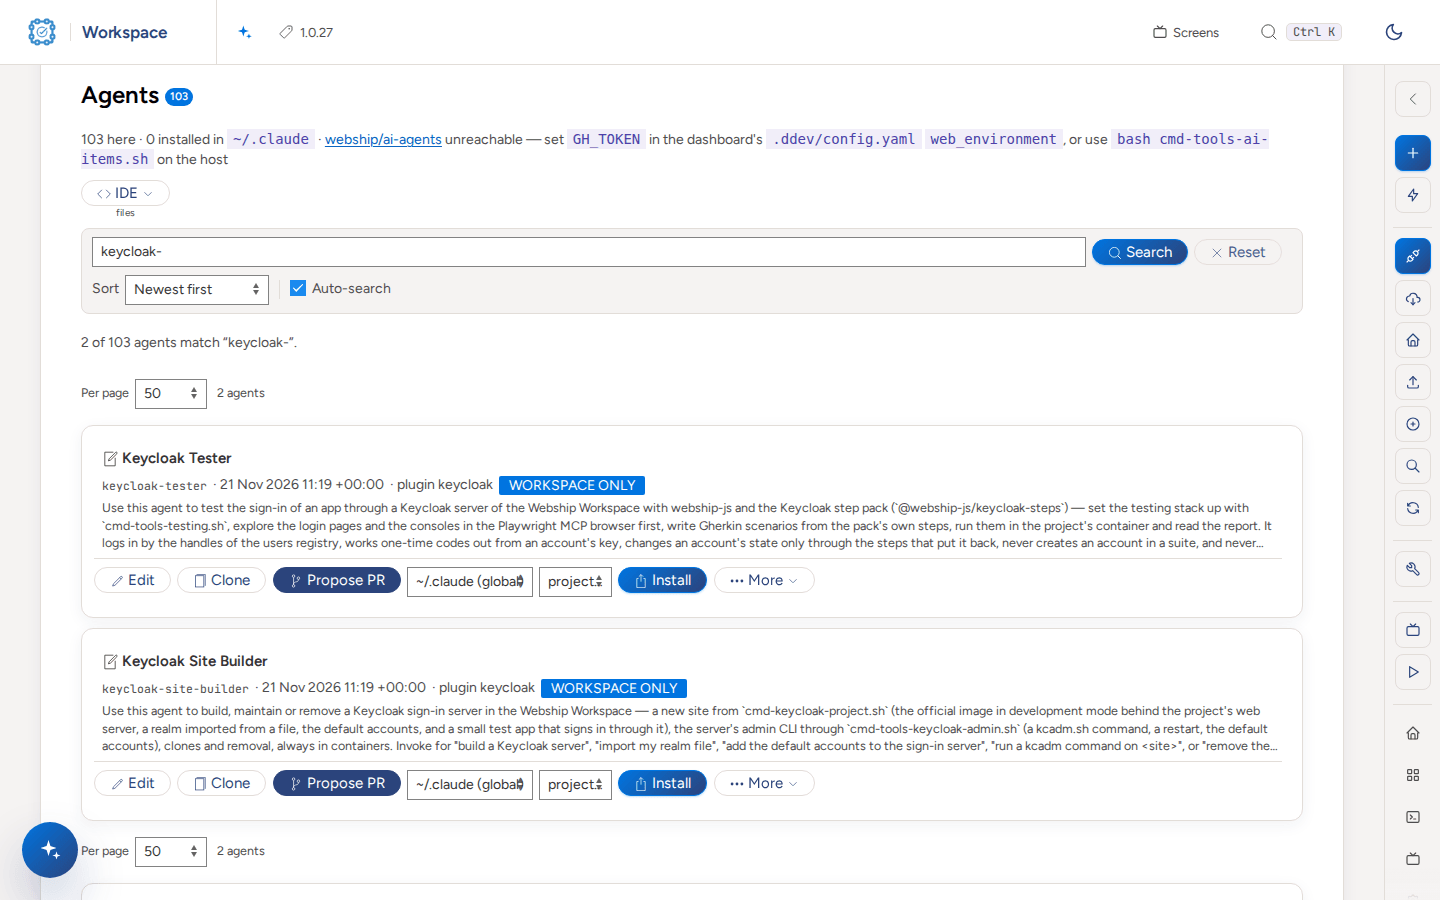
The plugin brings two AI agents, a site builder and a tester. They are on AI Agents, ready to install into your AI CLI.
Test it
Set up testing on the built sign-in test site: Tests → Set up the testing environment, or the command. The setup wires the Keycloak step pack (@webship-js/keycloak-steps) into cucumber.js with the accounts registry and writes a first feature, tests/features/site.feature.
bash cmd-tools-testing.sh keycloak-demo
Run the tests from Tests → Run the tests, or the command. The run is a screen session, and the row shows the result.
bash cmd-tools-testing.sh keycloak-demo --runThe tester agent writes and runs scenarios with the step pack. For tags, one feature, dry runs, failures and recordings, see "Test a project with Webship-js".